Demystifying the Root Canal Procedure: A Step-by-Step Guide

Are you feeling anxious about getting a root canal? Don’t worry, we’ve got you covered! In this comprehensive guide, we will demystify the root canal procedure and walk you through each step with expert advice and tips. Say goodbye to fear and uncertainty as we break down everything you need to know about this common dental treatment. Get ready to feel informed, empowered, and confident about your next visit to the dentist’s office!
Introduction to root canal treatment (RCT)
Are you feeling anxious about that upcoming root canal appointment? Don’t worry, you’re not alone! Root canal treatment (RCT) often gets a bad rap, but the truth is, it’s a common and highly effective procedure that can save your damaged tooth.
In this step-by-step guide, we’ll demystify the root canal process, debunk misconceptions, and help ease your mind about what to expect during and after your RCT journey. Let’s dive in!
Common misconceptions about RCT
When it comes to root canal treatment (RCT), there are several misconceptions that often lead to fear and anxiety for patients.
One common misconception is that RCT is extremely painful. In reality, advancements in technology and anesthesia have made the procedure relatively painless.
Another misconception is that RCT causes illness or other health problems. However, studies have shown that there is no scientific evidence linking RCT to systemic health issues.
Additionally, some believe that extracting the tooth is a better option than undergoing RCT, but saving the natural tooth through RCT is always preferred whenever possible.
Many also think that RCT requires multiple appointments and lengthy recovery time. With modern techniques, most cases can be completed in just one or two visits with minimal downtime.
It’s important to separate fact from fiction when it comes to RCT to make informed decisions about your dental health.
A quick step-by-step guide to the RCT procedure
Procedure details
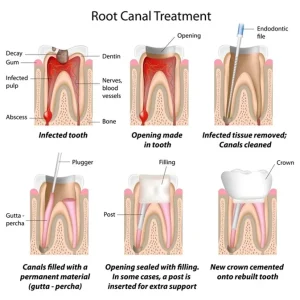
X-rays and diagnosis
Before embarking on a root canal treatment (RCT), your dentist will first take X-rays to examine the extent of damage to the tooth. This step is crucial in determining the best course of action for your specific case.
Local anesthesia
Once the diagnosis is made, local anesthesia will be administered to numb the area around the affected tooth. This ensures that you remain comfortable throughout the procedure and do not experience any pain.
Accessing the tooth
After numbing the area, your dentist will create a small opening in the tooth to access the infected pulp chamber. This allows them to remove all traces of infection and bacteria from within.
Cleaning and shaping of root canals
Using specialized tools, your dentist will clean and shape each root canal to ensure they are free from any debris or infection. This meticulous process is vital for successful treatment outcomes.
Filling and sealing
Once cleaned, the root canals are filled with a biocompatible material called gutta-percha before being sealed off to prevent reinfection. This step helps restore strength and function to your treated tooth.
Finishing touches: temporary filling vs permanent filling
Depending on your case, your dentist may opt for either a temporary filling or a permanent filling after completing RCT. Temporary fillings are common while waiting for a custom-made crown, or to cover the treated tooth temporarily till the next visit to a dental clinic, whereas permanent fillings may be used in some cases where immediate restoration is possible.
Each option serves its purpose in protecting your newly treated tooth until final restoration takes place.
Elaborated steps of the procedure
X-rays and diagnosis
The first step in a root canal procedure is getting X-rays to assess the tooth’s condition. These images help the dentist identify any signs of infection or damage deep within the tooth. By examining these X-rays, the dentist can determine if a root canal is necessary.
Following the X-ray analysis, a thorough diagnosis is made based on the findings. The dentist will discuss with you what they see in the images and explain why a root canal may be needed. This part of the process helps to ensure that you understand why this treatment is recommended and what it entails.
Understanding the role of X-rays and diagnosis in a root canal procedure can alleviate any fears or uncertainties you may have about undergoing this treatment. It’s all about gathering information to make informed decisions about your dental health. Trusting your dentist’s expertise during this phase sets the stage for a successful root canal treatment ahead.
Local anesthesia
Before starting the root canal procedure, your dentist will administer local anesthesia to ensure you’re comfortable throughout the treatment. The injection may feel like a small pinch, but it’s essential for numbing the area around the tooth being treated.
Local anesthesia works by blocking nerve signals in the affected area, so you won’t feel any pain during the procedure. Your dentist will wait a few minutes for the anesthesia to take effect before beginning.
Once your mouth is numb, your dentist can proceed with accessing and treating the infected tooth without causing any discomfort. It’s normal to experience some pressure or vibrations during certain parts of the procedure, but rest assured that you shouldn’t feel any pain thanks to the local anesthesia.
Remember, communication with your dentist is key. If you have any concerns or are feeling uncomfortable at any point during the procedure, don’t hesitate to let them know.
Accessing the tooth
Once the tooth is numbed, the next step in a root canal procedure involves accessing the inner pulp chamber. The dentist will create a small opening in the top of the tooth to reach the infected or damaged pulp inside. This access point allows for proper cleaning and treatment of the affected area.
Using specialized tools, such as dental files and irrigating solutions, the dentist carefully removes the diseased pulp tissue from within the root canals. This process ensures that all bacteria and debris are thoroughly cleaned out to prevent further infection or discomfort.
Accessing the tooth also enables the dentist to assess the extent of damage and determine if any additional steps are needed during the root canal procedure. By reaching this inner chamber, they can effectively address issues like decay, inflammation, or abscesses that may be present.
Overall, accessing the tooth is a crucial part of restoring oral health and alleviating pain associated with an infected pulp. It sets the stage for thorough treatment and eventual healing of your tooth structure.
Cleaning and shaping of the root canals
Once the tooth is accessed, it’s time for the intricate process of cleaning and shaping the root canals. This step is crucial in removing any infected or damaged tissue from within the tooth to ensure a successful treatment outcome.
Using specialized tools, the dentist carefully cleans out the pulp chamber and each root canal to eliminate bacteria and debris that may be causing pain or infection.
Next, the root canals are shaped to allow for optimal filling later on. This involves creating a smooth pathway for the filling material to seal off the canals effectively. By shaping the canals correctly, it helps prevent future reinfection and promotes the healing of surrounding tissues.
Precision and attention to detail are key during this stage of the procedure as even small remnants left behind could compromise the success of the root canal treatment. The goal is to thoroughly clean and shape each canal while preserving as much healthy tooth structure as possible. Some dentists use lasers to eliminate traces of bacteria & disinfect the tooth.
Filling and sealing
After cleaning and shaping the root canals, the next step in a root canal procedure is filling and sealing. This crucial step helps prevent future infection or reinfection of the tooth.
During this stage, a rubber-like material called gutta-percha is used to fill the cleaned-out root canals. The gutta-percha fills the space where the infected pulp was removed, ensuring no bacteria can re-enter.
Once filled, the tooth is sealed off to further protect it from any potential contaminants. A temporary filling may be placed on top until a permanent restoration like a crown is added.
Filling and sealing are vital parts of completing a successful root canal treatment. It ensures that your treated tooth remains healthy and functional for years to come.
Finishing touches: temporary filling vs permanent filling
After the root canals have been cleaned and shaped to perfection, it’s time for the finishing touches. The decision between a temporary filling and a permanent filling may seem like a minor detail, but it plays a crucial role in the success of your root canal treatment.
A temporary filling is just as it sounds – temporary. It provides protection while waiting for the permanent restoration to be placed. On the other hand, a permanent filling is designed to seal off the tooth permanently, preventing any bacteria from re-entering.
The choice between these two types of fillings depends on various factors such as the condition of your tooth, whether additional procedures are needed, and your dentist’s recommendation based on your specific case.
What to expect after the RCT procedure?
After completing your root canal treatment (RCT), it’s normal to experience some tenderness and sensitivity in the treated tooth. This discomfort typically subsides within a few days as your body heals. You may also feel relieved that the pain you had before the procedure is gone!
It’s important to follow any post-treatment care instructions provided by your dentist diligently. This may include avoiding hard or sticky foods, practicing good oral hygiene, and taking any prescribed medications as directed.
In some cases, a follow-up appointment may be necessary to monitor the healing process and ensure everything is progressing as expected. Don’t hesitate to reach out to your dentist if you have any concerns or unusual symptoms after your RCT.
Remember, everyone’s recovery experience can vary slightly, so listen to your body and give yourself time to fully recover from the procedure. Trust in the expertise of your dental team and rest assured that you’ve taken a proactive step towards preserving your natural tooth!
Recovery
After the root canal treatment, it is normal to feel some tenderness or discomfort for a few days. This can usually be managed with over-the-counter pain medications. It’s important to follow your dentist’s post-procedure instructions carefully to ensure proper healing.
Most patients are able to resume their normal activities soon after the procedure. However, it’s best to avoid chewing on the treated tooth until it is fully restored with a permanent filling or crown.
Remember that a root canal treatment saves your natural tooth and alleviates pain caused by infection or damage. By understanding the step-by-step process of RCT and debunking common misconceptions, you can approach this procedure with confidence and peace of mind.
If you have any concerns about undergoing a root canal treatment, don’t hesitate to discuss them with your dentist. They will be able to address any questions or fears you may have and guide you through the process from start to finish.
Recovery and maintaining good oral hygiene practices are essential for ensuring the success of your root canal treatment in the long term. Trust in your dental care team, follow their advice, and enjoy a healthy smile for years to come!


Post Comment